Share this

I should be a large image.
 
Updated Sep 16, 2024

Take a proactive approach TO managing your garden and landscape

The photo shows a diverse garden with vegetables and flowers with a diversity of plants growing together.

Many people want to manage their garden and landscape plants using non-chemical methods (no pesticides). Pesticides are products designed to kill weeds, mosses, insects, plant diseases, slugs, and rodents.

About Organic Pesticides

  • Organic does not mean pesticide-free. Organic pesticides are widely available.
  • Organic pesticide products are derived from plant, animal, and mineral sources. Common examples include neem oil, insecticidal soap, Bacillus thuringiensis (Bt), and copper fungicide sprays.
  • Organic pesticide products still have risks. Read and follow the label instructions to minimize risks and maximize benefits.
  • For more information, see Organic Pesticide Products.

Jump To

  1. Right Plant, Right Place, Right Care
  2. Soil Preparation, Planting & Care
  3. Use Physical Barriers and Hands-on Methods
 

Overview

  • Plants in your garden and landscape are vulnerable to insect pests and plant diseases.
  • Healthy plants resist pests and diseases. Stressed plants are more prone to problems.
  • Provide plants with the right growing conditions (soil, sunlight, water, fertilizer, and pruning).
  • Exclude pests from vulnerable plants with insect screening, row cover fabric, fencing, netting, and other methods.

Keys for Success

  • Choose plants to match your Plant Hardiness Zone and growing conditions.
  • Choose plants that are resistant to relevant pests and diseases for your area.
  • Plant healthy plants. Provide them with correct care, including soil preparation, fertilizer, water, and pruning.
  • Grow many kinds of plants together. A diversity of plants reduces the impact of pests and diseases.
  • Watch for insect pests and plant diseases. Address them before they become bigger problems.
  • Encourage wildlife such as birds, and beneficial insects such as ladybugs. These predators eat pest insects such as aphids.
Right Plant, Right Place, Right Care

Choose plants suited for the conditions of your worksite. Install the plants in optimal soil and optimal sunlight conditions. Give your plants the care they need over time.

PLAN BEFORE YOU PLANT

  • Choose plants that can survive the winter low temperatures where you live. Match your plants’ cold hardiness rating to your worksite.
  • Locate plants in places that provide the right amount of sunlight for the plants’ needs.
  • Install plants in places with the soil drainage conditions that support plant root growth.
  • Blueberries, vegetable crops, and many ornamental plants are pH-sensitive. They require the right soil pH to thrive. Test soil pH before installing plants. Adjust the soil pH to meet the needs of the plants you will grow.

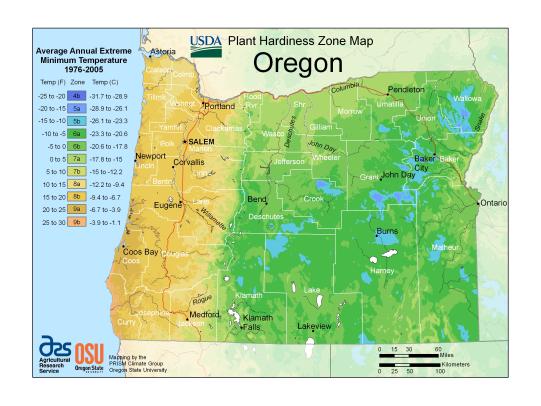
CHOOSE PLANTS THAT ARE COLD-HARDY FOR YOUR AREA; Expect aberrant weather

USDA Plant Hardiness Zone Map for Oregon

Agricultural Research Service, Oregon State University

Choose plants that are hardy to your zone. The map shows USDA Hardiness Zones in Oregon. Hardiness zones range from 1 to 11. Lower numbers in the scale relate to colder environments. Higher numbers relate to warmer environments. Choose plants hardy to your zone or a lower number.

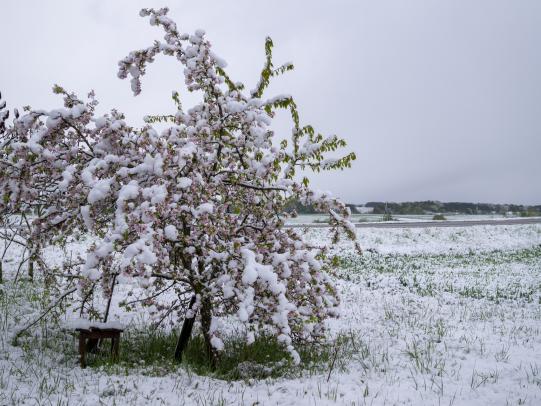
Apple tree with snow on flowers

NetPix, iStock

Expect aberrant weather patterns. The photo shows snow on an apple tree that has already blossomed. With climate change, we can expect aberrant weather patterns that will affect plants.

PLACE PLANTS IN THE RIGHT SPOT FOR SUNLIGHT

Different types of plants have different sunlight needs.

  • Determine the sunlight needs of the plants you want to grow. Check the plant tag or ask nursery staff. Or look up plants’ sun needs in books such as Sunset Western Garden Book  (Sunset Publishing Corporation).
  • Then think about the sunlight needed in the context of where you are in the Pacific Northwest. For example, is your worksite on the coast, mountains, or warm inland areas?
  • Place plants in spots that provide the right amount of sunlight according to your worksite and regional environment.
Rhododendron plant with flopping branches in too little sun

Signe Danler, Oregon State University

Install plants in spots that have the right amount of sun. The photo shows a rhododendron plant grown in full shade. Its stems are flopping and leaves are sparse.

Rhododendron with dense, compact growth

Signe Danler, Oregon State University

In comparison, the rhododendron in this photo is healthy. It has strong branches supporting dense, compact foliage. The plant is growing in an inland area with partial shade, ideal for rhododendrons.

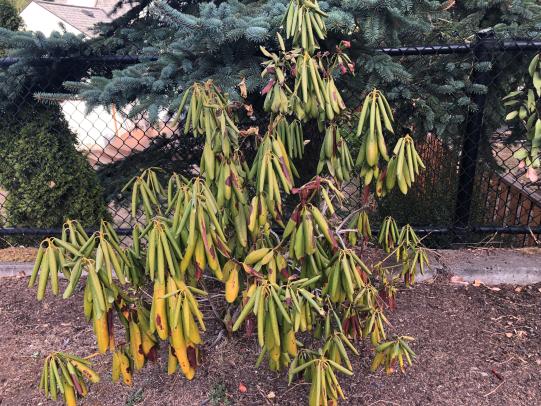
Rhododendron with sunburned leaves

Weston Miller, Oregon State University

The leaves of this rhododendron are burned from too much sunlight. The plant is suffering from drought stress. Rhododendrons planted in full sun away from coastal areas are often damaged by these conditions.

MATCH PLANTS TO THEIR PREFERRED SOIL DRAINAGE CONDITIONS

  • Soil drainage refers to how water moves across, through, and out of soil due to gravity.
  • Soil drainage is determined by soil pore size and soil texture (proportion of sand, silt, and clay), depth of the soil, and the slope of the area. Water moves more quickly through sandy soils compared to clayey soils.
  • Different types of plants require specific soil drainage conditions to thrive.
  • If you have an area with slow drainage, choose plants that tolerate wet soil conditions.
  • Improve soil drainage if you want to grow plants that require well-drained conditions.
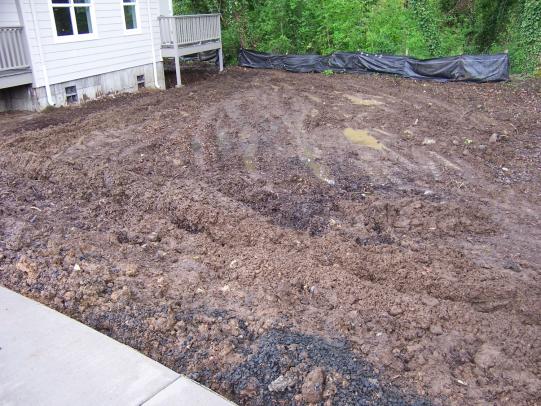
Construction site with standing water

Neil Bell, Oregon State University

The photo shows an area with exposed soil, ready for landscaping. Large soil clods and standing water indicate slow soil drainage. Choose plants that tolerate wet soil for this area. Or fix the drainage by grading it to sheet water and/or importing soil to build raised planting areas.


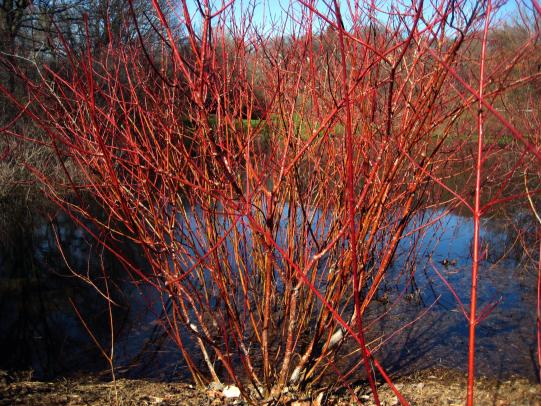
Red osier dogwood near pond

If you have an area with slow or poor drainage, choose plants that tolerate seasonally wet or saturated (throughout the year) soil conditions. The red osier dogwood (Cornus sericea) shown in the photo tolerates wet soil conditions.

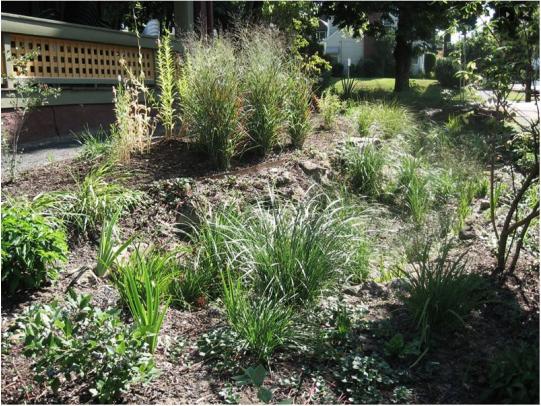
Constructed rain garden with wetland plants in swale area

East Multnomah Soil and Water Conservation District

The photo shows a constructed rain garden, including a swale that captures and absorbs runoff from the roof of the house. Wetland plants such as slough sedge are planted in the swale bottom where the soil is saturated for weeks or months. Plants that require faster soil drainage are planted on the swale berm.

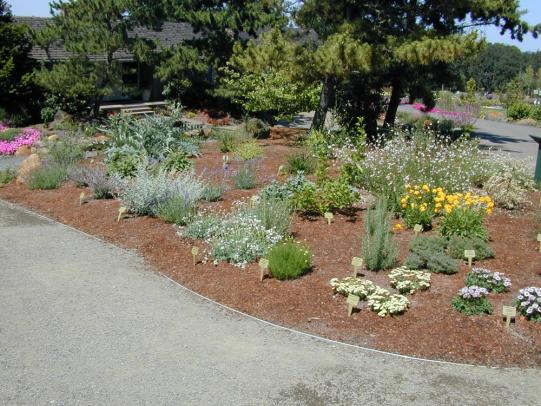
Mounded area with newly installed plants and mulch

Neil Bell, Oregon State University

The photo shows a planted area that includes mounds that provide fast soil drainage. The plants chosen for the site don’t tolerate saturated soils at any time in the year. They require moist, well-drained soil to thrive.

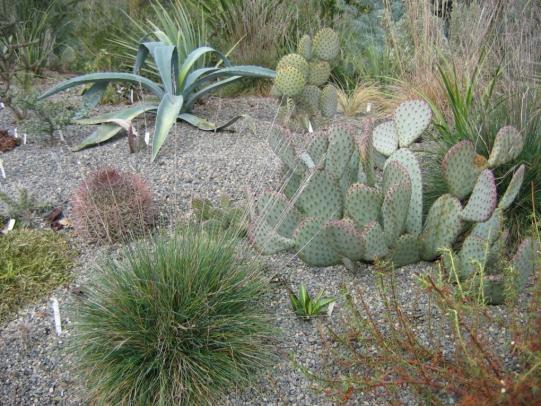
Rock garden with low water need plants

Neil Bell, Oregon State University

Plants adapted to dry environments (little available soil water conditions) often require excellent soil drainage to thrive. Improve soil drainage when the seasonal rain and native soil conditions of your site don’t match the dry environments of plants from dry areas.

ADJUST SOIL pH BEFORE PLANTING AND MAINTAIN IT

  • Test the soil pH before investing in plants for your garden or landscape.
  • See How do I test my garden soil  (OSU Extension Service) for more information.
  • Blueberries, vegetable crops, and many ornamental plants require a specific and narrow soil pH range to thrive. Amend the soil as needed for your plant.
  • Vegetable crops grow best in soils with a pH range from 6.0–7.0.
  • Blueberries and rhododendrons thrive in soils with a pH range of 4.0–5.5.
  • Adjust the soil pH as needed. Follow the recommendations from the soil test (if available). Use Soil Test Interpretation Guide  (OSU Extension Service) to determine application rates.
  • Use agricultural lime or dolomite lime to increase soil pH.
  • Use elemental sulfur to lower soil pH.
  • Add these amendments before planting. Amending in advance allows the materials time to change the soil pH before you plant.
  • Regularly test the soil pH if you grow pH-sensitive plants. Add lime or sulfur as needed to maintain the optimal soil pH.
  • Plants grown in soil with the correct pH will not have pH-related nutrient deficiencies. They will also be less prone to damage from insects and diseases.
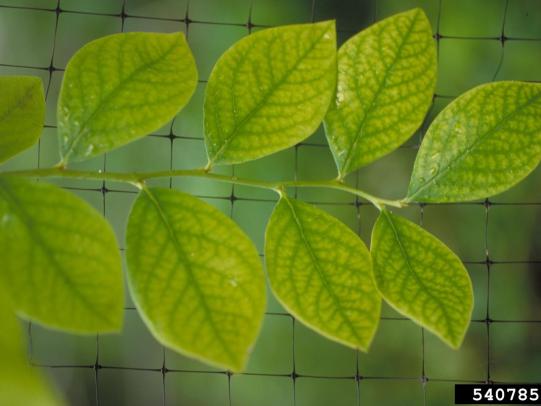
Blueberry leaves with iron deficiency symptoms

John Hartman, University of Kentucky, Bugwood.org

The photo shows a blueberry plant suffering from iron deficiency. This condition is often a result of a soil pH higher than blueberries’ preferred pH range. Blueberries need soil with a pH of 4.0–5.5 to thrive. Test your soil pH before planting blueberries. Add sulfur to the soil surface based on soil test recommendations. Adding sulfur lowers the soil pH.

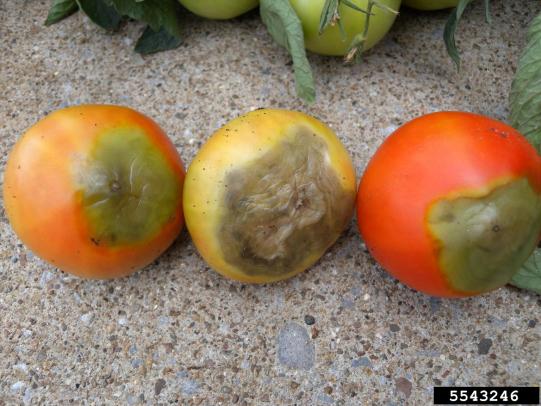
Tomato fruits with blossom end rot symptoms.

Brenda Kennedy, University of Kentucky, Bugwood.org

The photo shows tomatoes with blossom end rot. Blossom end rot is caused by a calcium deficiency or other calcium uptake problems in the soil. In the acidic soils of the Pacific Northwest west of the Cascade Mountains, blossom end rot is commonly associated with soil pH below the optimal range for vegetables. Irregular watering causes soil moisture levels to fluctuate. Dry soil prevents roots from taking up calcium. Water regularly and apply mulch to prevent blossom end rot.

More About Soil pH and Lime

  • Annual vegetables grow best in soil with pH of 6.0–7.0.
  • When soil pH is outside this range, vegetable crops fail to thrive.
  • Adding lime to acidic soil helps to increase the soil pH and the tomatoes’ nutrient uptake. The lime also provides calcium.
  • Add lime before planting tomatoes and similar crops.
  • Fall is the best time to apply lime. It takes time for lime to change soil pH.

SELECT PEST- AND DISEASE-RESISTANT PLANTS

  • Choose plant varieties that are resistant to locally relevant pests and diseases. You can avoid plant loss by choosing pest- and disease-resistant varieties of desired plants.
  • Look for pest- and disease-resistant varieties of roses, rhododendrons, and apples.
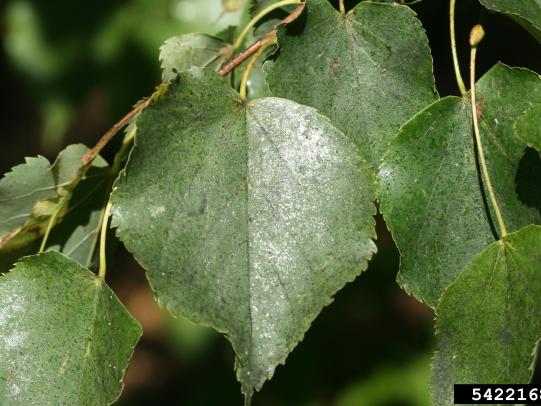
Linden tree leaves infested with aphids and sooty mold

Whitney Cranshaw, Colorado State University, Whitney Cranshaw, Colorado State University, Bugwood.org

Linden trees (Tilia spp.) are prone to damage from aphids. Aphids feed on the leaves and create a sticky residue. The residue encourages the growth of black sooty mold. Linden trees that are attacked by aphids will make a mess if the tree is growing over patios and parking areas. Don’t plant linden trees in areas where the sticky residue and sooty mold are intolerable.

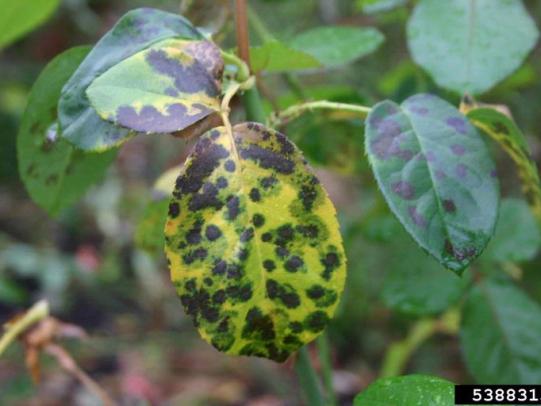
Black spots on mottled green and yellow rose leaves

William Fountain, University of Kentucky, William Fountain, University of Kentucky, Bugwood.org

The rose in the photo has black spot (a fungal disease). Leaves and stems develop black spots during wet, warm weather. Severely infected leaves turn yellow and fall off the plant. This disease is common west of the Cascade Mountains in the Pacific Northwest.

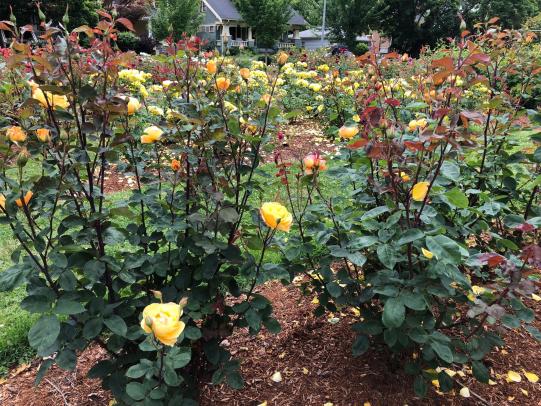
Disease resistant roses are public rose garden

Weston Miller, Oregon State University

The leaves of the roses at a public rose garden don’t show blackspot symptoms. Roses that are resistant to blackspot are less likely to be impacted by the disease. Choose resistant varieties in areas where blackspot is a known issue. See Rose Cultivar Resistance  (PNW Plant Disease Management Handbook).

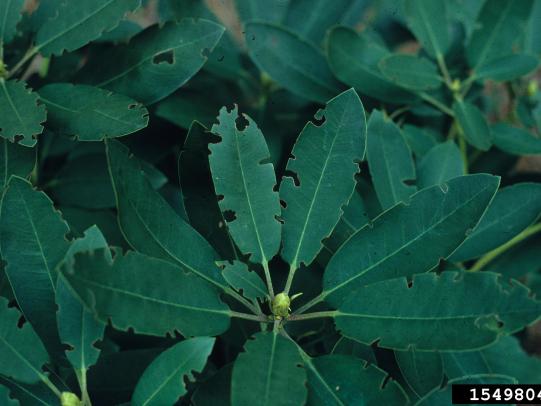
Rhododendron leaves with notched edges

Jim Baker, North Carolina State University, Bugwood.org

Some rhododendron varieties are damaged by root weevils, a pest insect for landscape shrubs. The photo shows rhododendron leaves with notches along the leaf edges. This damage is caused by root weevils.

Healthy Rhododendron leaves

OSU Department of Horticulture Landscape Plants © Oregon State University, 1999-2015

Rhododendron varieties that aren’t damaged by root weevils are available. For example, the variety ‘P.J.M.’ is resistant to root weevils. Choose root weevil-resistant varieties of rhododendron to minimize damage from these pests.

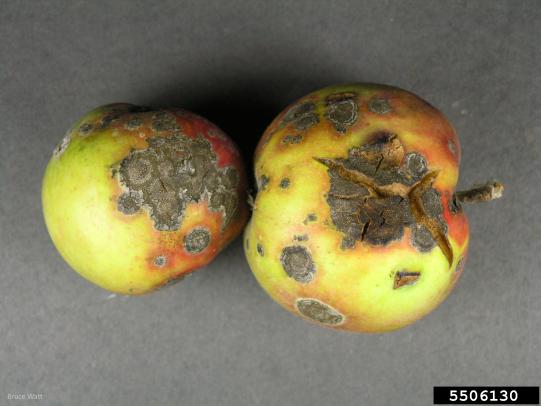
Apple fruits showing symptoms of apple scab

Bruce Watt, University of Maine, Bugwood.org

Many popular apple varieties are impacted by apple scab disease. For example, ‘Red Delicious,’ ‘Golden  Delicious,’ ‘Fuji,’ and ‘Braeburn’ varieties are susceptible to apple scab.

Disease-free ‘Liberty’ apples

Weston Miller, Oregon State University

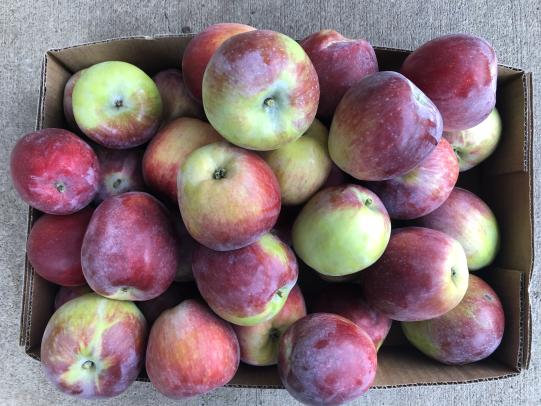
Apple varieties such as ‘Liberty,’ ‘Enterprise,’ ‘Easy-Gro,’ and others resist apple scab effectively. Other varieties resist it to varying degrees. Choose resistant varieties in areas where apple scab is an issue.

More about Apple Scab

  • Wet springs experienced in areas west of the Cascade Mountain range promote plant diseases such as apple scab.
  • Growing apple varieties prone to scab is challenging in these areas. Fungicide treatments are needed to grow quality apples for varieties that are susceptible to scab in these areas.
  • Avoid apple scab by choosing resistant varieties. See Apple Cultivar Susceptibility  (PNW Plant Disease Management Handbook).


SELECT HEALTHY PLANTS

  • Inspect plants before you buy them.
  • Make sure the foliage, stems, and roots are not damaged.
  • Check for insects, diseases, and weeds.
  • Look at the roots of container-grown plants, when possible. Is the plant root-bound?
  • Healthy plants in your garden and landscape are less prone to damage from insect pests and diseases.
Damage free hydrangea in nursery pot

Signe Danler, Oregon State University

Inspect plants to ensure they don’t show signs of damage. The photo shows a hydrangea plant in a 1-gallon container. The branches and leaves are full and compact. Check new plants for insects, diseases, and weeds and reject problem plants.

Comparison of root-bound and well-grown roots of container grown plants

Signe Danler, Oregon State University

Check the roots of container-grown plants. The photo shows the roots of two plants grown in 1-gallon containers. The plant on the left has roots that just fill the container. The plant on the right is root-bound. The roots are thicker and wrap around the edge of the pot.

Photo comparing healthy and unhealthy broccoli seedlings

Weston Miller, Oregon State University

The broccoli plants on the left are green, showing new growth. The broccoli plants on the right show signs of stress. The leaves are pale green, yellow, and red. Avoid planting stressed annual vegetables and flowers. They won’t perform well. And they are more likely to be damaged by insect pests and diseases.

What to Do about Root-bound Plants

  • For root-bound perennial plants, score the roots and tease them apart before planting.
  • After the roots are scored and separated, prune stems and leaves to roughly match the amount of undamaged roots.
  • These steps help the roots to grow into the worksite soil.
Soil Preparation, Planting & Care

PREPARING SOIL FOR PLANTING

  • Planning and action will ensure the successful establishment of plants in your new landscape areas.
  • Add and mix compost and amendments into soil before you install landscape plants.
  • Spread 3-4 inches of compost on the area you intend to plant.
  • Mix it in as deeply as possible with a fork or shovel. Or use a rototiller to mix the compost into the soil.
  • Then dig holes. Install plants into the amended soil.

Before Digging, Contact Your Local Utility Locate Service

For large areas or compacted soil, consider using heavy equipment to prepare the site. Before you dig, contact Oregon 8-1-1   or Washington Utility Notification  or your state’s utility locating agency.

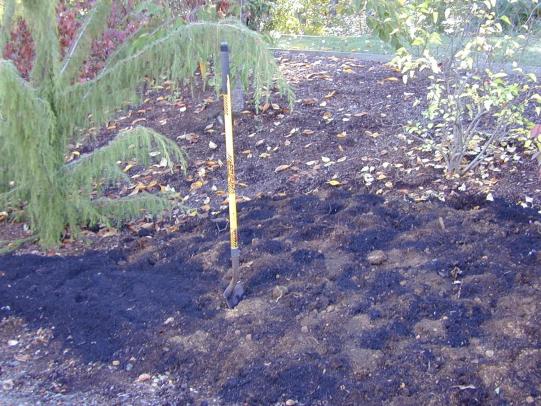
Shovel shown in use, mixing soil with compost

Neil Bell, Oregon State University

Spread compost over the area where you want to install new plants. Mix the compost in as deeply as possible. Add soil amendments such as lime and N-P-K fertilizer as needed. Then dig holes in the amended soil. Install the new plants. Use bagged compost for smaller jobs. A single 1-cubic-foot bag of compost will cover an area 2.5 feet long x 2.5 feet wide (5 square feet) with 2.4 inches of compost.

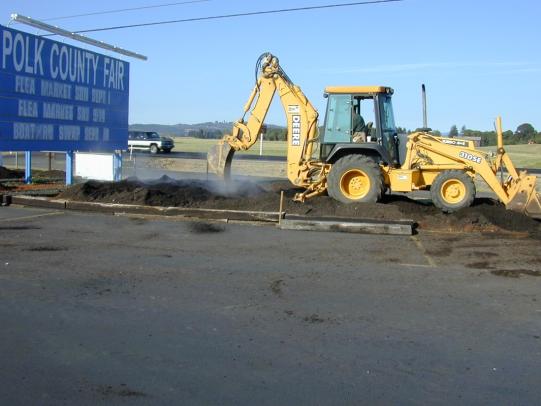
Backhoe mixing compost into compacted soil near parking lot

Neil Bell, Oregon State University

For large areas or compacted soil, consider using heavy equipment. The backhoe shown in the photo effectively mixes compost into a minimum soil depth of 1.5-2 feet. Get bulk compost delivered for bigger jobs. Before digging with a tractor, locate utilities in the area. Request a utility locate before you dig.

Detailed instructions How to Plant Trees & Shrubs
place holder image
Scott Benish


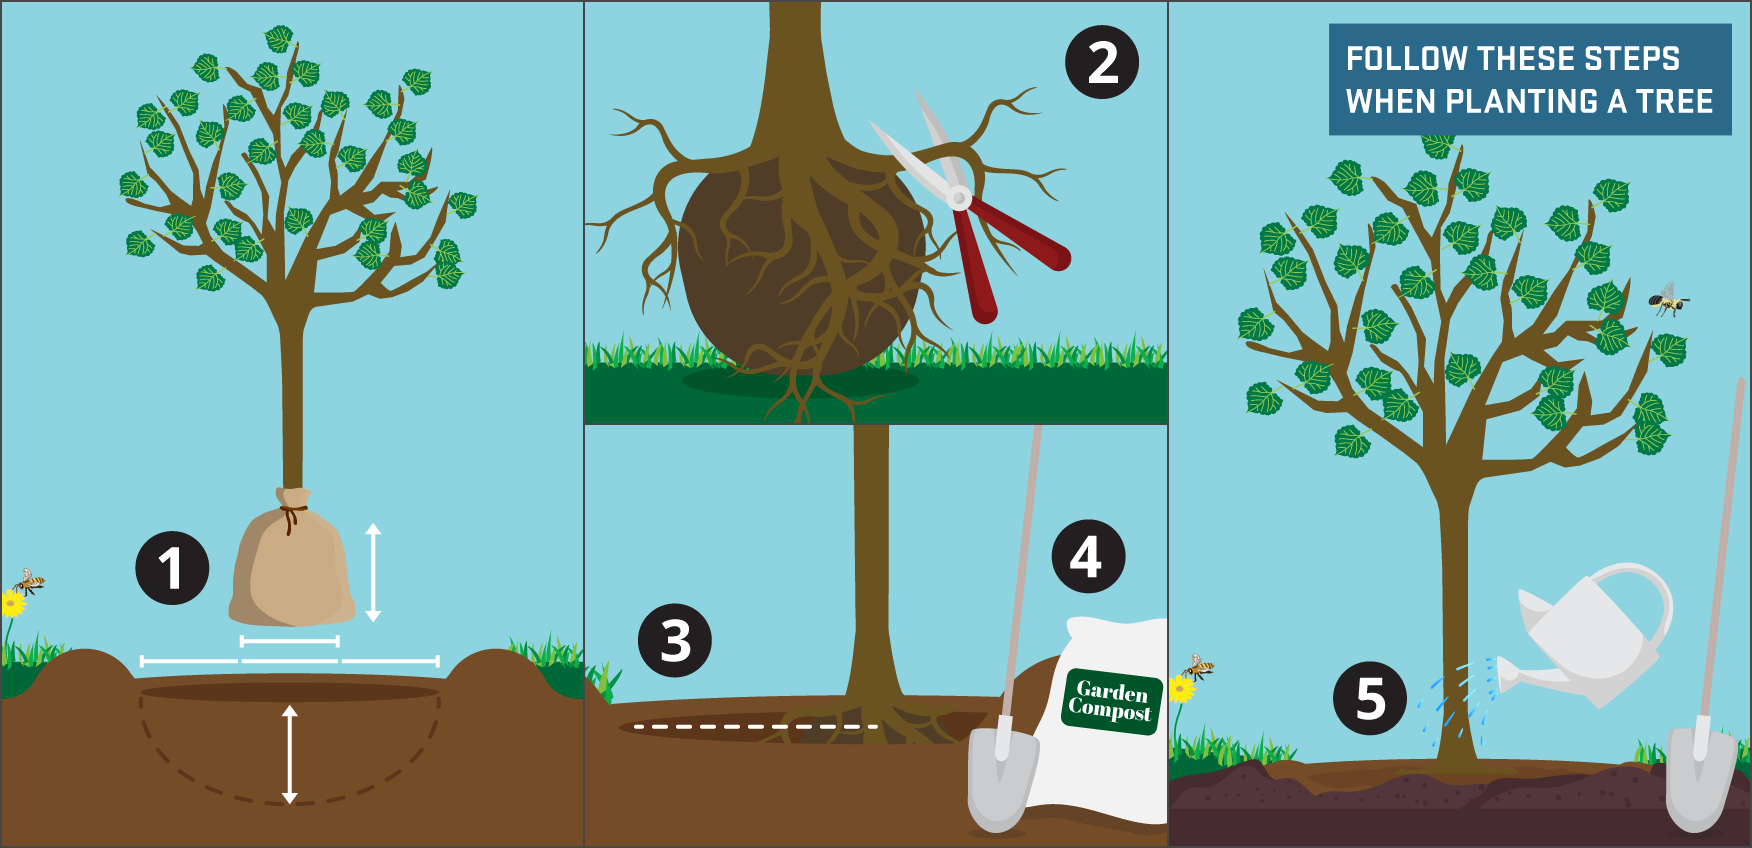
Follow these stems when planting a tree:

  1. Dig a hole 2–3 times the diameter of the root ball. It should be no deeper than the height of the root ball.
  2. Loosen or cut any circling or upward-growing roots. These roots cause poor growth. While planting, remove excess potting soil to expose the root system.
  3. Place the tree or shrub in the hole so the tops of the roots are slightly above soil level. For grafted trees, make sure the graft junction is at least 1 inch above the soil line.
  4. Amend the dug-out soil with compost and other amendments as needed. Fill the hole with the amended soil. Don’t fill the planting hole with pure compost or potting soil.
  5. Water the roots in thoroughly. Place mulch over the root zone, but not piled against the trunk.


Avoid planting root bound plants as shown below.

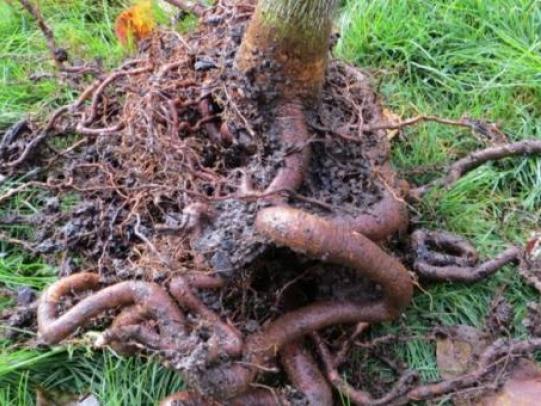
Bare root tree with tangled roots wrapping around the root ball.

Signe Danler, Oregon State University

Root-bound trees and shrubs fail to grow vigorous roots and stems. The photo shows a bare root tree with tangled roots wrapping around the root crown. Inspect trees and shrub roots before you purchase them. Avoid root-bound plants. If root-bound plants are your only option, prune the roots and separate them apart before planting.
PROVIDE YOUR PLANTS WITH THE RIGHT CARE

  • Provide plants with enough water.
  • Use N-P-K or other fertilizers to provide plant nutrients as needed.
  • Use mulch to help conserve water and keep new weeds from growing.
PROVIDE WATER AS NEEDED SEASONALLY

  • Drought-stressed plants are prone to pest and disease problems.
  • Provide your plants with the water they need to grow properly.
  • Water plants deeply to encourage robust root systems. Don’t over-apply water. Soggy soil can lead to root rot diseases.
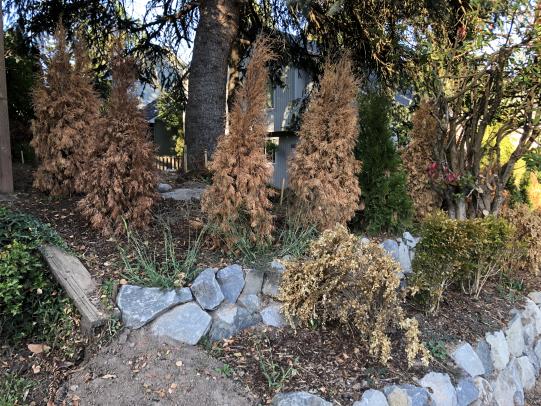
Newly installed landscape plants showing signs of drought stress

Weston Miller, Oregon State University

The photo shows newly installed landscape plants experiencing drought stress. Plants need consistent water after planting to establish and grow.

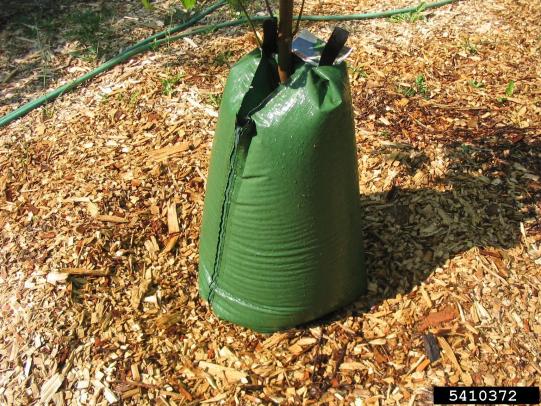
Slow-release watering bag on newly planted tree with mulch around base

Joe Murray, Treebio.com, Bugwood.org

The photo shows a watering bag. Watering bags release water slowly, which helps newly installed plants to establish.

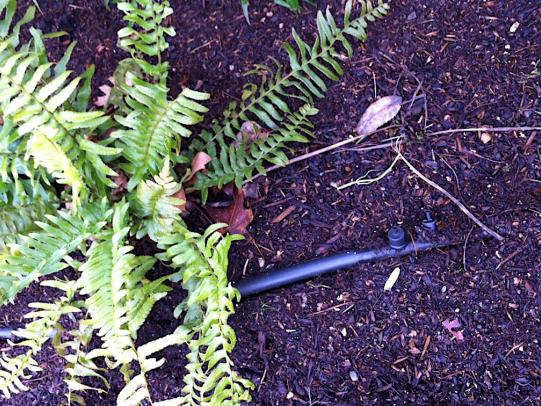
Drip irrigation tubing and emitters in landscape

Weston Miller, Oregon State University

Drip irrigation provides an effective and convenient way to provide water to plants.

PROVIDE FERTILIZER AS NEEDED

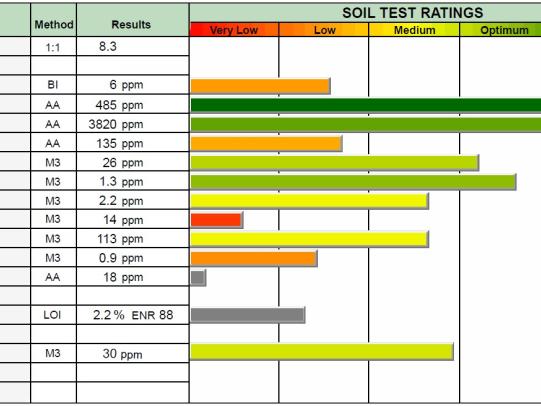
Example soil analysis results

Waypoint Analytical Labs

The photo shows example soil test results, including soil pH, percent organic matter, and nutrient analysis.

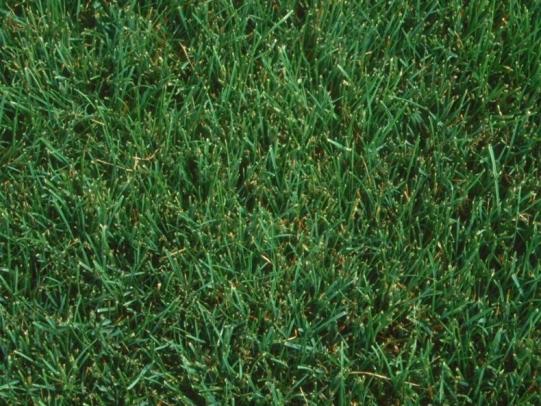
Dense stand of dark green turfgrass

OSU Turfgrass Management Program

Provide lawns with water and nutrition. Apply seed over the top of your lawn (overseed) at least every other year. Following product instructions, apply slow release fertilizer, if needed, in spring or fall or both.  Avoid summer fertilizing as it can lead to harmful algal blooms.

USE MULCH TO CONSERVE WATER AND SUPPRESS WEEDS

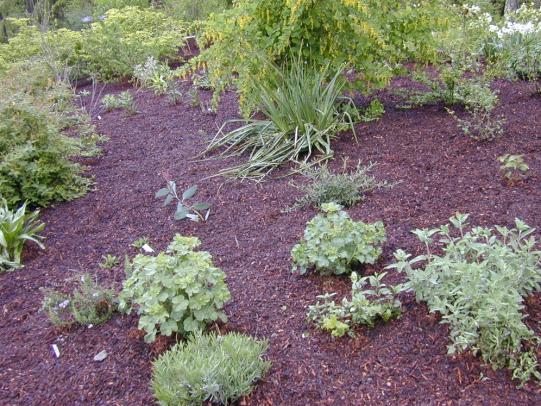
Bark dust mulch between landscape plants

Neil Bell, Oregon State University

Mulch conserves water and suppresses weed seeds from germination. It improves soil structure over time. Carbon-rich mulches like wood chips, bark dust, and straw are less likely to support weed seedlings.

Compost mulch with weeds growing in it

Neil Bell, Oregon State University

When compost is used as a mulch, weeds sprout and grow as shown in the photo. Compost is an amendment that is mixed into the soil before planting.

USE SANITATION METHODS

  • Prune or dispose of plants damaged by pests and diseases.
  • Remove weeds growing around your desirable plants.
  • Keep your tools clean. Sanitize following pruning of diseased plants as needed.
  • Use crop rotation in vegetable gardens and orchards to avoid the accumulation of soil-borne pests and diseases.

GOOD HYGIENE METHODS FOR PLANTS WITH PEST AND DISEASE PROBLEMS

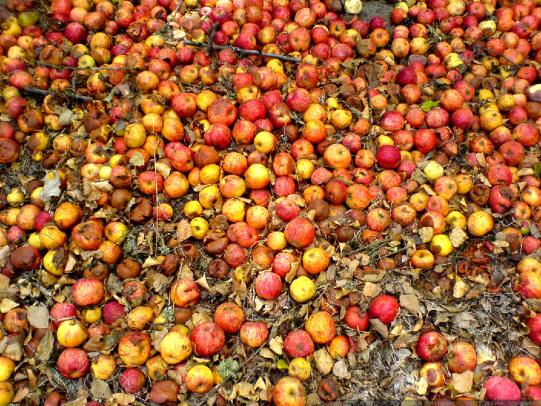
Fallen apples

Clean up fallen fruits to help disrupt pest and disease cycles. The photo shows apples on the ground with insect damage (signs of codling moth and apple maggot infestation). Raking up and removing fallen apples helps to break the pest life cycle. Fewer pests will emerge next spring.

Summer squash leaf showing symptoms of a viral infection

Signe Danler, Oregon State University

Rake up and dispose of diseased leaves. The photo shows leaves infested with rose black spot being raked into a bag.

Summer squash leaf showing symptoms of a viral infection

Weston Miller, Oregon State University

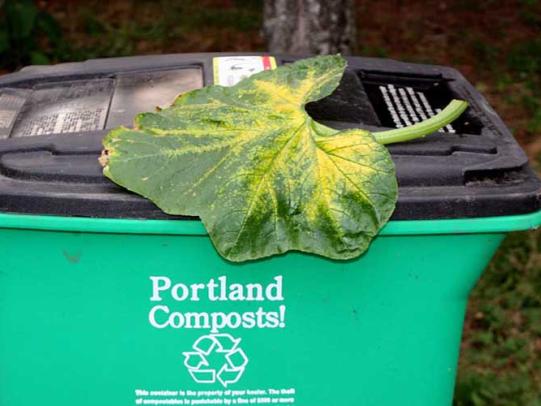
Don’t compost diseased or pest-infested plants on your site. Put them in your green waste recycling bin as shown in the photo. Or take pest- and disease-damaged plant material to your local composting facility.

CONTROL WEEDS AROUND DESIRED PLANTS

Kale plants crowded by many weeds

Jen Aron, Oregon State University

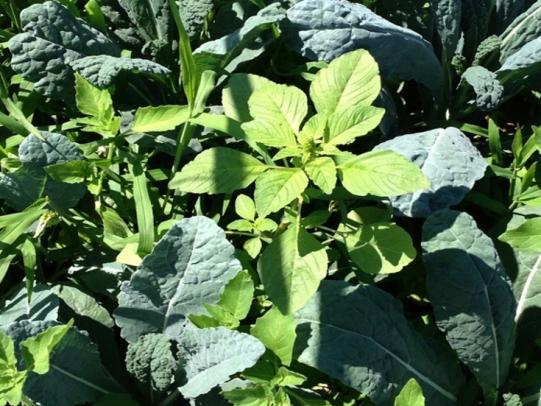
The photo shows kale plants growing with many weeds. Weeds growing close to desired plants compete for light, water, and nutrients. Stressed plants are prone to pest and disease damage.

Spring flowering weeds in landscape area

Neil Bell, Oregon State University

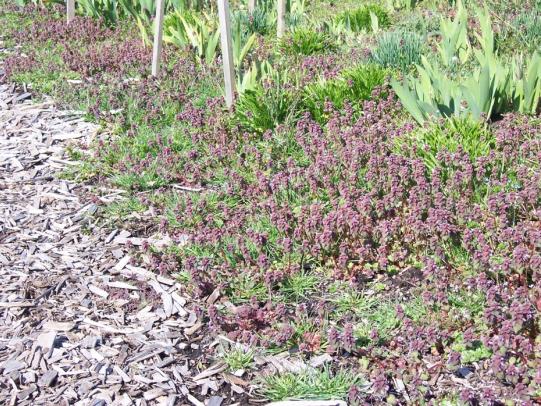
The photo shows a landscape area with many spring-flowering weeds. This site will look better and desirable plants will thrive if weeds are removed. Adding mulch to the soil surface after weeding would help to suppress weed growth.

KEEP YOUR TOOLS CLEAN

Clean pair of hand pruners

Signe Danler, Oregon State University

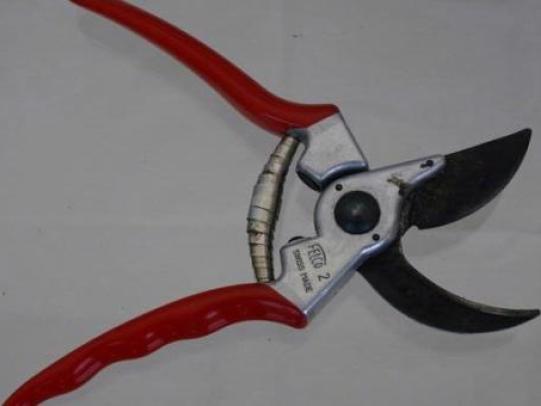
Some plant diseases can transfer from one plant to another on pruning tools. Prune healthy plants before diseased ones. Disinfect pruner blades after pruning infected plants. Keep pruner blades sharp for clean pruning cuts that heal quickly.

Gloved hand using metal brush to clean shovel

Weston Miller, Oregon State University

Clean your tools when you move from one site to another. Brush off dirt to keep from spreading weed seeds between sites. Maintain your tools over time. Apply oil to the metal and wood handles.

ROTATE CROPS FOR VEGETABLE GARDENS

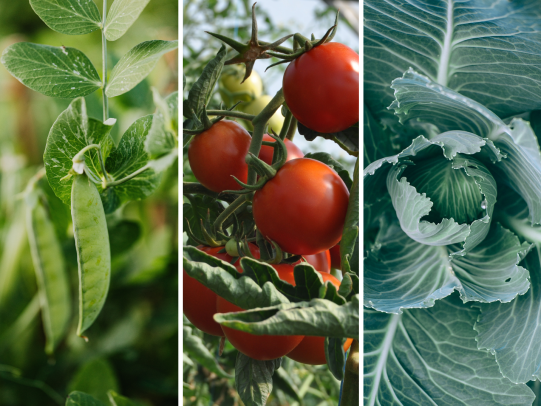
Photo panes showing peas, tomatoes, and cabbage

iStock (cropped)

An example crop rotation is to grow peas followed by tomatoes and then cabbage as shown in the photo.

More About Crop Rotation

  • Growing vegetable crops repeatedly in the same space will lead to pest and disease problems.
  • Rotate vegetable crops. Grow plants that share diseases in different places each year.
  • This method prevents soil-borne pest and disease accumulation.
Use Physical Barriers and Hands-on Methods
  • Use barriers to keep pests away from desired plants.
  • Catch pests and diseases early, before problems get worse.

BARRIERS TO PROTECT PLANTS

Plant collar protecting stems of kale seedling

Signe Danler, Oregon State University

Plant collars protect young plants from pests such as cutworms. Make collars from toilet-paper tubes, paper cups, or cans. Place the tubes over the seedlings and press the end 1 inch into the soil.

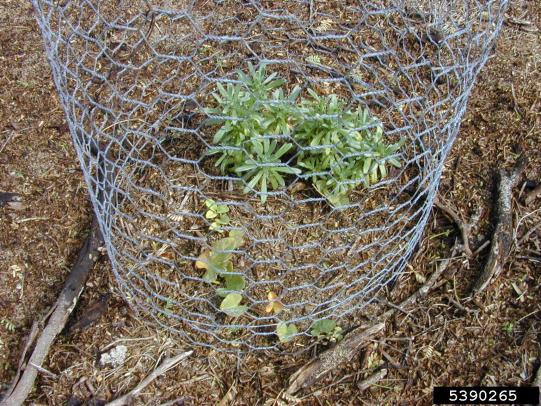
Chicken wire plant cage protecting plant

Forest and Kim Starr, Starr Environmental, Bugwood.org

Wire fencing is another way to protect plants from pests such as rabbits, birds, and deer.

Plant cage with wood frame and row cover fabric to cover seedlings

Signe Danler, Oregon State University

Fabric plant cages keep flying pest insects from laying eggs on plants. The frame can be wood, wire, PVC pipe, or a tomato cage. Cover it with row cover fabric, cheesecloth, or organza fabric. Pull the fabric tight around the frame and staple or clip it in place.

Copper tape around the rim of a plant container

Weston Miller, Oregon State University

Slugs and snails are repelled by a copper barrier. The wider the barrier, the better. The copper surface works best if it is kept clean.

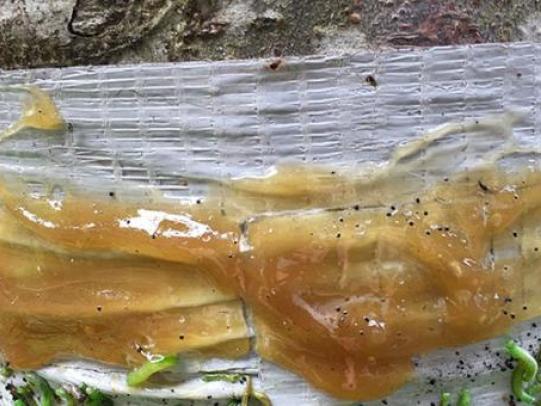
Sticky barrier on plastic wrapped around a tree trunk

Monica Maggio, Core Home Fruit

Sticky barriers can prevent insect pests from climbing up or down a tree trunk. This stops adults from climbing up to feed, and larvae from crawling down to pupate.

More BARRIERS TO PROTECT PLANTS

  • Row covers prevent pests and pollinators from reaching the flowers. Remove covers from crops such as tomatoes and squash when flowering begins.
  • Check plants under row covers to make sure pests are not present under the cover.
  • Use netting and fencing to keep animals away from plants, as needed.
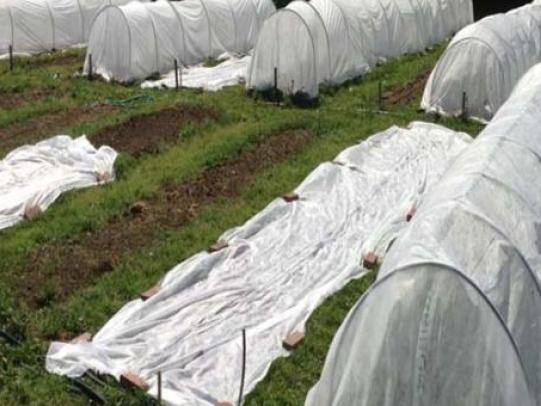
Row cover fabric over young plants

Weston Miller, Oregon State University

Row cover fabric can protect rows of crops from pests. Support row cover with wire, metal, or plastic hoops. It can also be draped over plants without a supporting structure.

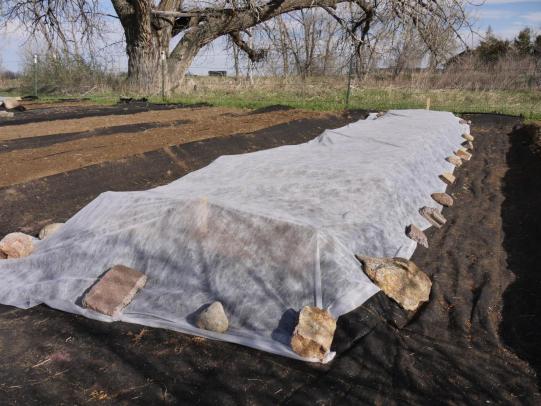
Row cover supported by wire and weighted with rocks

Weigh down the edges of the row cover fabric with boards, bricks, or soil. The goal is to prevent pests from crawling under the row cover. The weight helps to secure the fabric from blowing away.

Bird netting supported by hoops over raised beds

Signe Danler, Oregon State University

Use bird netting to protect crops from birds. Use metal or plastic hoops to support bird netting.

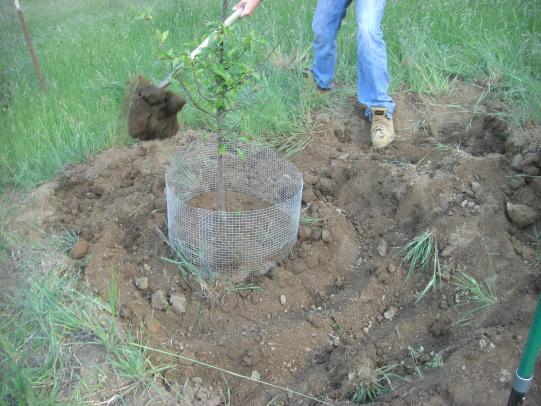
Fruit tree with roots in wire basket to keep out gophers

"Image" by Danny Thorpe is licensed under CC BY 2.0.

Gophers feed on the roots of many types of plants, including fruit trees. If gophers are a known problem in your area, use wire baskets to exclude them from the roots of new trees as shown in the photo.

Netting over garden beds

pcturner71, iStock

The photo shows a sturdy netting with pipe frames to protect garden beds. The device excludes squirrels and birds from the desired plants.

Plastic sleeve protecting fruit tree trunk

Weston Miller, Oregon State University

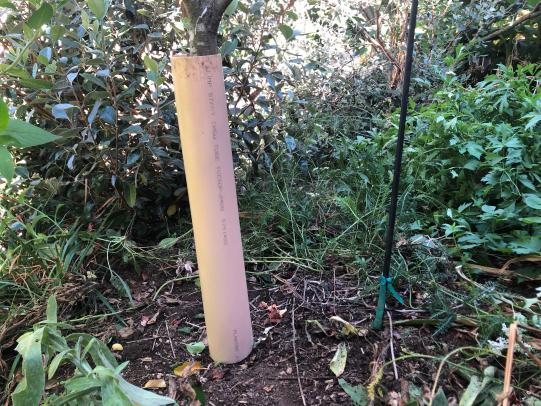
Voles (meadow mice) damage fruit tree plants by gnawing on the bark at the base of trees. Protect young fruit trees and grape vines from vole-girdling damage. Use cylinders made from hardware cloth, sheet metal, or heavy plastic (shown in photo) that surround the trunk.

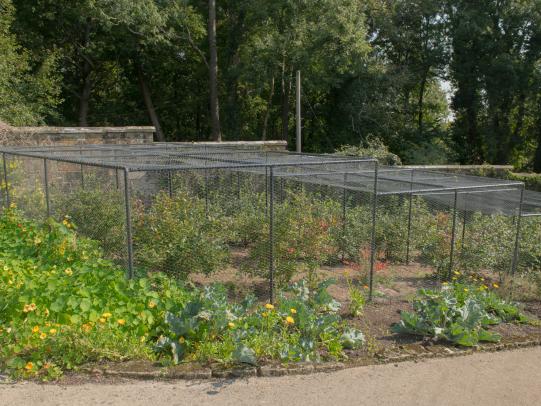
Fenced off garden area

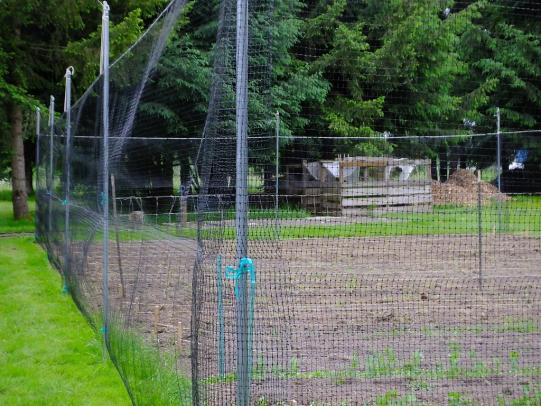
Install sturdy fencing to exclude deer and elk from your garden, orchard, and landscape as needed. Fences exclude domestic animals such as chickens and dogs.

MANUAL CONTROL, TRAPS & WATER SPRAYS

  • Manually remove insect pests from desired plants. Look on the undersides of leaves to find aphids and insect larvae.
  • Trap slugs and snails with beer or board traps.
  • Use a high-pressure water spray to knock insect pests off plants.
Imported cabbage moth larvae and pupa on leaf

Whitney Cranshaw, Colorado State University, Bugwood.org

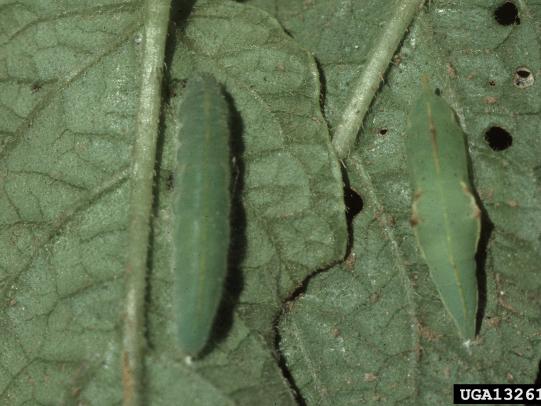
Pick off larger pests, such as slugs, tomato hornworms, and cabbage moth larva (shown in photo). Drop them into soapy water.

Aphids on rosebud

Whitney Cranshaw, Colorado State University, Bugwood.org

Squashing aphids by hand is a quick and easy way to deal with them. When squashed, aphids release chemicals that attract beneficial insect predators.

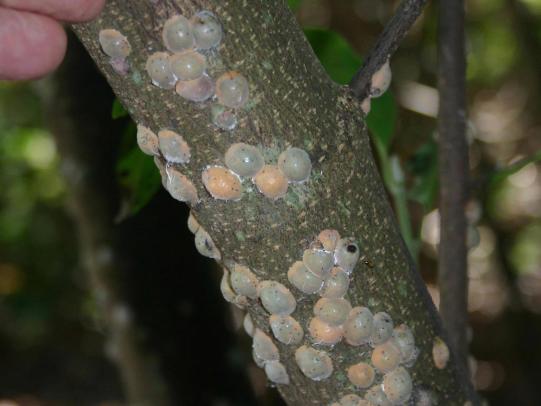
Scale insects on Magnolia branch

William Fountain, University of Kentucky, Bugwood.org

For scale insects, scrape off insects with your fingertip or plastic edge. Scrape scale insects into soapy water.

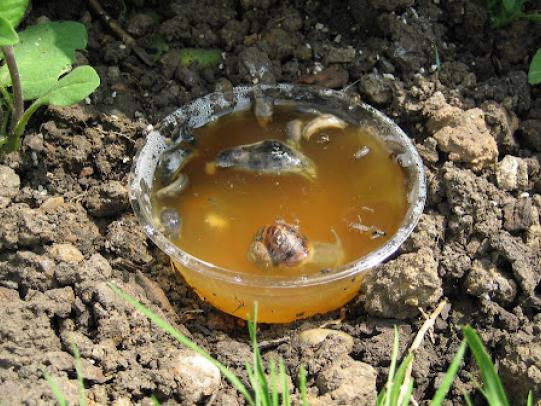
Beer trap with many captured slugs

"Beer Trap Success" by SteveR- is marked with CC BY 2.0

Use trapping methods for slugs, snails, and other soil-dwelling pests. The photo shows a beer trap for slugs.

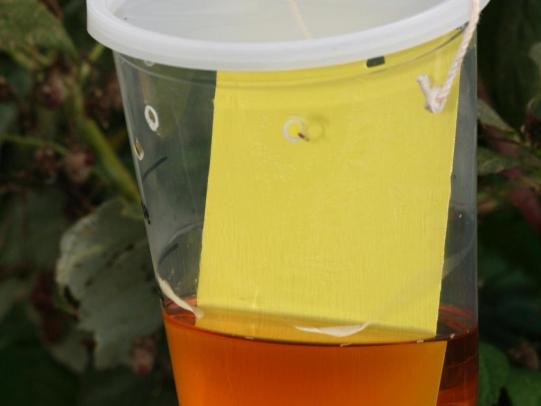
Trap for spotted wing drosophila

Hannah Burrack, North Carolina State University, Bugwood.org

The spotted wing drosophila (SWD) fruit fly poses a challenge for strawberries, blueberries, and raspberries and other thin-skinned fruit. Use easy-to-make traps with vinegar to monitor for SWD. Placing numerous traps in and around your berry crop areas captures many SWD fruit flies.

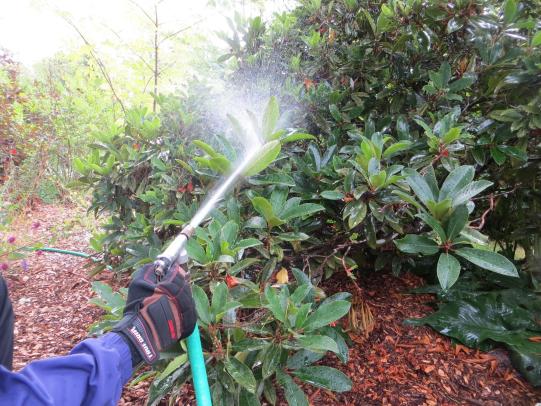
Water spray being used to knock azalea lace bugs off rhododendron

Signe Danler, Oregon State University

Use a high-pressure water spray on infested leaves. A strong stream will remove and injure aphids, lace bugs, and other soft-bodied insects. Spray the undersides of the leaves. Repeat as needed.

PRUNE OUT INSECT DAMAGE AND DISEASED BRANCHES

Remove insect damage and diseased tree and shrub branches. Pruning keeps insect pests and disease problems from spreading.

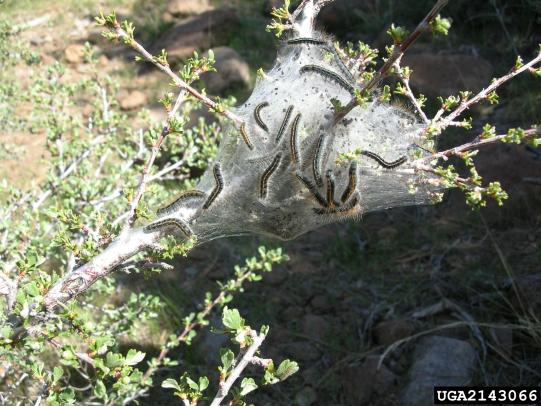
Branch infested with western tent caterpillars

Brytten Steed, USDA Forest Service, Bugwood.org

Prune out tent caterpillar colonies (shown in photo).

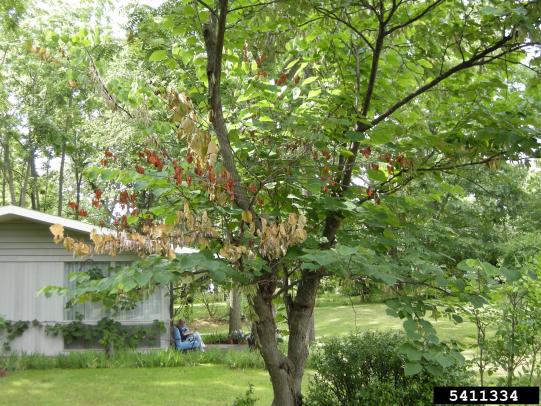
Tree with dead branch

Mary Ann Hansen, Virginia Polytechnic Institute and State University, Bugwood.org

Prune out diseased, dead, and dying branches on trees and shrubs.

TILLING to disrupt soil insect life cycles

  • Till soil to disrupt soil-borne pests such as slugs and snails, cutworms, and symphylans.
  • Rototilling disrupts the life cycle of soil-dwelling pests. It kills, buries, or exposes them to predators.
  • However, repeated tilling can damage soil structure and beneficial organisms. Tilling may bring weed seeds to the surface, creating another problem.
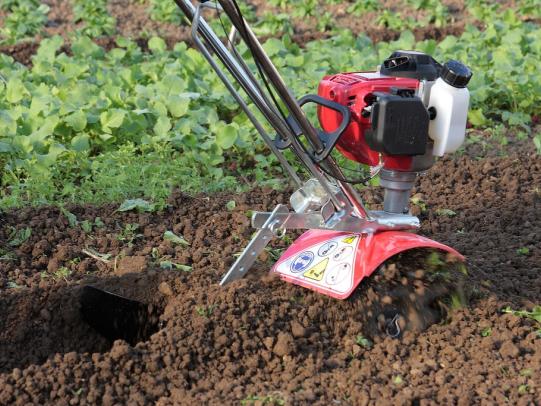
Small tiller in use

Small tillers such as the one shown in the photo are useful for controlling soil-borne slugs, symphylans, and insects such as armyworms and cutworms.

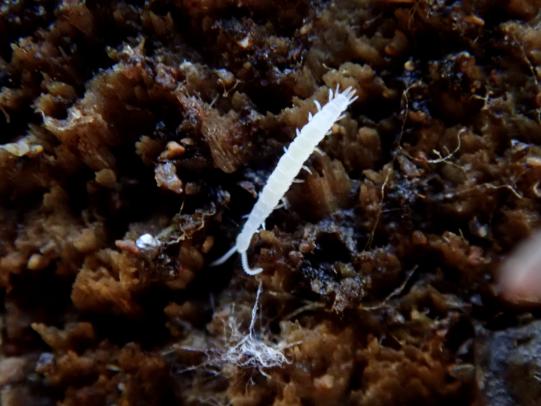
Symphylan in soil

"Symphylan" by Brenda Dobbs is licensed under CC BY-NC 2.0.

Symphylans are soil-borne, insect-like organisms that feed on the roots of vegetable crops. They become a problem when a lot of organic matter (compost) has been added to the soil.

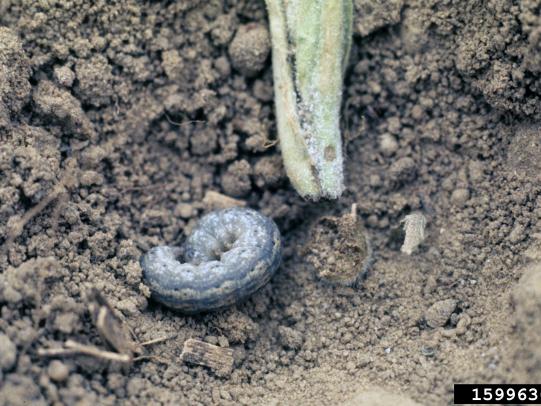
Cut worm in soil

John C. French Sr., Retired, Universities:Auburn, GA, Clemson and U of MO, Bugwood.org

Cutworms and armyworms are both larva of moth species. They lay their eggs in groups. When the eggs hatch, the larvae move across the landscape en masse.

vacuum to remove nuisance insects from your structures

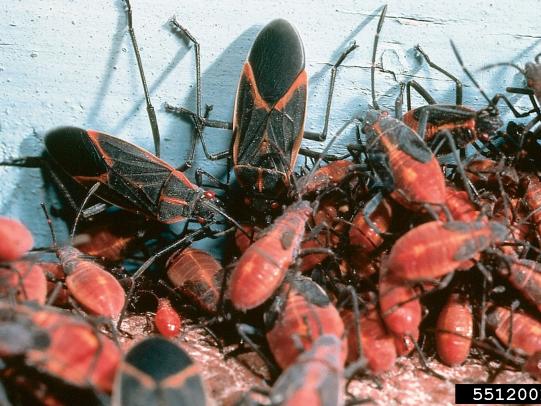
Boxelder bugs and brown marmorated stink bugs (BMSB) are known to congregate on structures. Large numbers of insects sometimes gather in and around structures from fall through early spring. Insects seek sheltered locations to overwinter.

Boxelder bugs on wall

Kansas Department of Agriculture, Bugwood.org

If you have many boxelder bugs or BMSBs on or in your structure, clean them up.

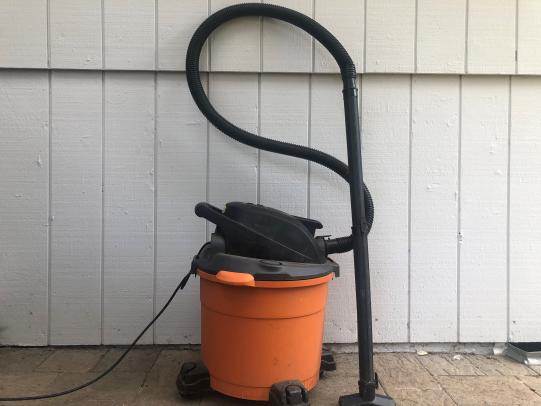
Shop vacuum and exterior siding

Weston Miller, Oregon State University

Use a vacuum cleaner to remove boxelder bugs from your structures. Alternatively, hand-pick or sweep them up. Put the debris in a sturdy plastic bag and dispose of it in the trash.

Content provided by editor Weston Miller and writers Signe Danler and J. Jeremiah Mann.

 Peer reviewed by OSU Department of Horticulture.

Photo of Weston Miller

Weston Miller

Project Founder and Content Writer

Weston Miller served as Community and Urban Horticulture faculty for Oregon State University Extension Service for Clackamas, Multnomah, and Washington Counties. Weston is an author for content for this website. He developed funding partnerships with Portland area agencies to initiate and build out the Solve Pest Problems website focused on this goals:

Signe Danler

Signe Danler (Editor/Writer)

Signe Danler is a veteran Master Gardener and landscape designer, with an MAg degree in Horticulture from OSU, and an emphasis on Urban Horticulture. As instructor for the OSU Extension Service online Home Horticulture and Master Gardener Program, she uses her experience and training in gardening, urban forestry and ecological landscaping to communicate about and promote sustainable gardening and landscaping practices.

J. Jeremiah Mann

J. Jeremiah Mann

J. Jeremiah Mann completed a Physical Science undergraduate degree at Humboldt State University, and M.S, Ph.D focusing on plant science topics at UC Davis. He went on to work for the Natural Resources Conservation Service and in a leadership position serving a private agricultural technology company. He currently lives in Sacramento California where he consults on pest and property management topics.